Setup

Reel-to-Reel Transfer

WAY OUT OF DATE...NEED TO UPDATE Purpose:

To transfer a reel-to-reel tape to digital and subsequently to a CD-R.  Basically, we transfer the tape to a digital recorder.  Then we take the digital recorder and transfer that to the computer and subsequently to CD-R or whatever.  (no R09 recorder anymore).

To record 4 tracks at once you have two options:

Option 1: Using Space and Xavier to record 4 tracks at once.  2 tracks go to Xavier and 2 tracks to Apollo and both get recorded by Vegas.

Option 2: Using Flag and Xavier to record 4 tracks at once.  2 tracks go to Xavier and get recorded by Vegas.  2 tracks go to Flag and get recorded by CineCap Velocity HD.

AKAI GX-630D SS reel-to-reel deck

Supplies/parts:

  • Edirol R09 or equivalent recorder
  • Akai 4 track reel-to-reel tape deck
  • Take-up reel
  • Head set with 1/4" phono plug
  • RCA (M) pair of cables to RCA (M) (4-6ft) (for option 2)
  • RCA (M) pair of cables to RCA (M) (10ft)(can use 3 cable video cable)(for option 2)
  • RCA (M) double to mini-phono stereo adaptor
  • RCA (M) double to mini-phono stereo adaptor (for option 1)
  • RCA (F) to RCA (F) dual adaptor (for option 2)
  • Xavier
  • Flag (for option 2)
  • (16mm Sniper unit)(for option 2)
  • Space (for option 1)

Reel-to-Reel Tape

Make sure the tape is run through the machine correctly.  The tape on the reel should have a glossy side up (in other words facing out).  The duller side should be facing the centre of the reel and when transported through the machine it is the dull side that should be facing the heads.

Before set-up and processing you can load the tape and check to see how many tracks have been recorded on...if there are only 1 or 2 tracks, then you only need one computer system.  Space may have a cable already plugged into the line-in jack.

Setup (using Xavier and Space)(option 1):

  • Cable from Akai to Space:
    • Plug the stereo phono plug into the line-in in the back of Space (this may already be plugged in and the RCA ends will be hanging at the front of the rack)
    • Plug RCA ends of the Y cable into outputs of track 2 & 4 (or the tracks that have audio)  on the back of the Akai
  • Cable from Akai to Xavier:
    • Plug the stereo phono plug into the line-in in the back of Xavier (this or another cable in)
    • Plug RCA ends of the Y cable into outputs of track 1 & 3 (or the tracks that have audio)  on the back of the Akai
  • Open Vegas:
    • On Space (and Xavier) open Vegas and insert an audio track
    • Make sure the correct audio card is set up
      • Under preferences - audio device
        • device type: windows classic wave driver
        • default audio recording device: Line-In (high definition audio)
    • Make sure the folder for saving the audio is created
    • Arm for record
  • Akai deck:
    • Clean the heads with alcohol
    • Mount the tape
    • Turn power on
    • Adjust volume
      • centre knob at the bottom and the front part (the ring at the back is for balance)
      • adjust so that the input to Vegas is reasonable
      • usually knob is around 11:00
    • Test the speed, etc
  • Record:
    • On Space – in Vegas, click the record button below the timeline
    • On Xavier – in Vegas, click the record button below the timeline
    • On the Akai deck, hit the play button
  • Monitor:
    • Monitor the vue meters on the Akai deck to make sure something is playing
    • Xavier’s audio should be outputting something if the vue meters are showing activity on tracks 2 or 4.
  • Done:
    • On Space: click stop button below the timeline
    • On Xavier: click stop button below the timeline
  • Clean-up:
    • Close Vegas on Space – don’t have to save the veg file.
    • Close Vegas on Xavier – don’t have to save the veg file.
    • Rewind the reel-to-reel and then turn it off
    • Unplug all the cables and plug the original ones back in

Setup (using Xavier and Flag)(option 2):

  • Cable from Akai to Xavier:
    • Plug the RCA to RCA 6ft cable into outputs of track 2 & 4 on the back of the Akai
    • Plug RCA female adaptor onto the 6ft cable
    • Plug the Y cable into the 2X RCA female adapters
    • Plug the stereo phono plug into the line-in in the back of Xavier (you may have to remove the black plug with the thing on the wire because it normally provides the audio from Flag thru Xavier)
  • Cable from Akai to Flag:
    • Plug the RCA to RCA 10ft cable into outputs of track 1 & 3 on the back of the Akai
    • Plug the other end of the 10ft cable into the Blackmagic cable harness at the back of Flag
      • Plug left into left audio input (labelled on the wire)(you’ll have to remove the cable coming from the switch box)
      • Plug right into right audio input (labelled on the wire) (you’ll have to remove the cable coming from the switch box)
  • Open CineCap Velocity HD:
    • On Flag open CineCap and enter the name of the customer
    • Turn on 16mm Sniper HD (this is needed so CineCap works)
  • Open Vegas:
    • On Xavier open Vegas and insert an audio track
    • Make sure the correct video card is set up
    • Make sure the folder for saving the audio is created
    • Arm for record
  • Akai deck:
    • Clean the heads with alcohol
    • Mount the tape
    • Turn power on
    • Test the speed, etc
  • Record:
    • On Xavier – in Vegas, click the record button below the timeline
    • On Flag: - in CineCap click the start button
    • On the Akai deck, hit the play button
  • Monitor:
    • Monitor the vue meters on the Akai deck to make sure something is playing
    • Xavier’s audio should be outputting something if the vue meters are showing activity on tracks 2 or 4.
  • Done:
    • On Xavier: click stop button below the timeline
    • On Flag: click the stop and keep buttons.
  • Clean-up:
    • Close Vegas on Xavier – don’t have to save the veg file.
    • Close CineCap on Flag
    • Turn off the 16mm Sniper
    • Rewind the reel-to-reel and then turn it off
    • Unplug all the cables and plug the original ones back in

Setup (for recorder device):

  1. Take RCA cable and plug it the two plugs into the back output panel on the AKAI deck.   Plug into "rear" "track 2" and "track 4".
  2. Take the other end of the RCA cables and plug them into the RCA to mini phono stereo adaptor.
  3. Plug the mini phono stereo adaptor into the Edirol R09's line input.
  4. Make sure the Edirol is set up correctly....
  5. ....check that the Edirol is not full
  6. ....check that the record format is 16bit wave
  7. ....make sure the unit is plugged into the AC outlet for power
  8. Mount the take-up reel on the right spindle and lock in place (pinch the spindle, pull out, and twist to lock)
  9. Mount the reel of tape to be recorded on the left spindle and lock in place (pinch the spindle, pull out, and twist to lock)
  10. Flip the head cover (the part in the middle of the AKAI deck that has the AKAI label) up to provide a clear view of the heads for threading the tape.
  11. Thread the tape as per in the picture above.  The tape under the head cover is just "lying there" because the tape simply gets pulled against the heads by the wheels and levels on either side of the head cover area (ie. no special threading under the head cover).
  12. Turn on the Edirol and turn on the record to ready mode (blinking red)
  13. Plug the head set into the AKAI deck's Phono so you can listen to the recording....try both the front and rear sockets (front lower left of the deck).
  14. Test the recorded tape.....
  15. .....check the tape speed (switch is next to the power switch)
  16. .....check the Edirol levels to make sure that the stereo is picking up correctly
  17. Rewind the tape to the start once everything has been tested
  18. Turn on the Edirol and push the record button.
  19. Push the play button on the AKAI.
  20. Make note of which VU meters indicate something on the track.  If  all four indicate something, then you'll have to redo the record for the other 2 tracks by switching the RCA plugs at the back of the AKAI unit when you finish recording the current 2 tracks.
  21. When the tape finishes, thread the tape back to the original reel  making sure to thread the tape the same as if you were going to play the tape.
  22. Push the rewind button and rewind the tape.
  23. You may have to go back to step 10 and repeat this if the other tracks have anything on them.  Switch the plugs in the back of the AKAI deck.
  24. Now take the card or use USB and transfer the audio tracks from the Edirol to the computer......

Further References:

http://en.wikipedia.org/wiki/Audio_tape_specifications

http://en.wikipedia.org/wiki/Reel-to-reel_audio_tape_recording

Dance Competition Technical Setup Overview

The Four Departments

  1. Photography
  2. Videography
  3. Sales
  4. Editing

Below is a basic technical overview of our typical setup (without adjudication), with each department's responsibilities in different colors.

setup-overview

Brief Overview

Photography

  • Gear: Camera, Tripod, Memory Cards, Laptop, Paper + Pen, Event Program, Business Cards
  • Role: Take photos, transmit to server
  • Network Components: Power, Ethernet, USB

Videography

  • Gear: Video Camera, Tapes, Paper + Pen, Event Program, Business Cards
  • Role: record video, note capture log, monitor audio
  • Network Components: Power, Ethernet, Firewire, Audio, BNC

Sales

  • Gear: 3 Preview Computers, 3 LCD Monitors, 3 Mice, Pens, Order Forms, Debit Machine, Petty Cash, Business Cards, Event Program, tmmDance.com Promo Papers, Stapler
  • Role: Take sales from customers, deliver sales to customers, communicate with editor
  • Network Components: Power, Ethernet, USB Hard Drives?

Editing

  • Gear: 3 Computers (Editing, Photo Server, Video Capture Bot), 3 LCD Monitors, 3 Mice, 1 keyboard, 2 Printers, DVD-Burner(s), Blank DVDs, Blank CDs, Photo Paper, DVD Cases, CD Cases, Regular Paper, Pen, Event Program, Business Cards, Gaffer Tape, Router, Switch, Dedicated Hard-drive(s)
  • Role: Monitor Video Capture, Produce customer orders (edit/render/burn/print), monitor servers, monitor photo stations, Backup Video
  • Network Components: Internet?, Ethernet, Firewire, Power

Dance Competition: Photography

Pre-Preparation

Before the competition days, make sure all batteries are charged, and memory cards are empty.  On the laptop you will be using, ensure that xampp has been installed, along with the "Dance Photos Autosuggester & Mover" program.  Make sure that it has been properly installed and is functioning.

Review the outline of the theatre you will be shooting in, and where you will be located.

Make sure that it has been pre-coorinated that you will have access to power and you are able to run an ethernet cable from wherever you will be situated all the way to the main switch, which is typically near the editing station.

You will need the following items for this department setup:

Camera Gear

  • Digital SLR Camera Body
  • Zoom Lens
  • Mid-range Lens
  • 2 Batteries minimum
  • Battery charger
  • 2 Memory cards mimimum
  • Regular 6 ft. USB Cable
  • 10 ft. USB Extension cable
  • USB card reader
  • Tripod with special pivot head

Computer Gear

  • Fast Notebook Computer
    • Gigabit network connection
    • Minimum 60 GB free space
  • Carrying case
  • Ethernet cable (location-determined length)
  • Power Cord
  • Power Bar
  • Extension power cable (loaction-determined length)

Hardware Setup

When setting up for photography, put your battery and a memory card in the camera, and put it on the tripod.

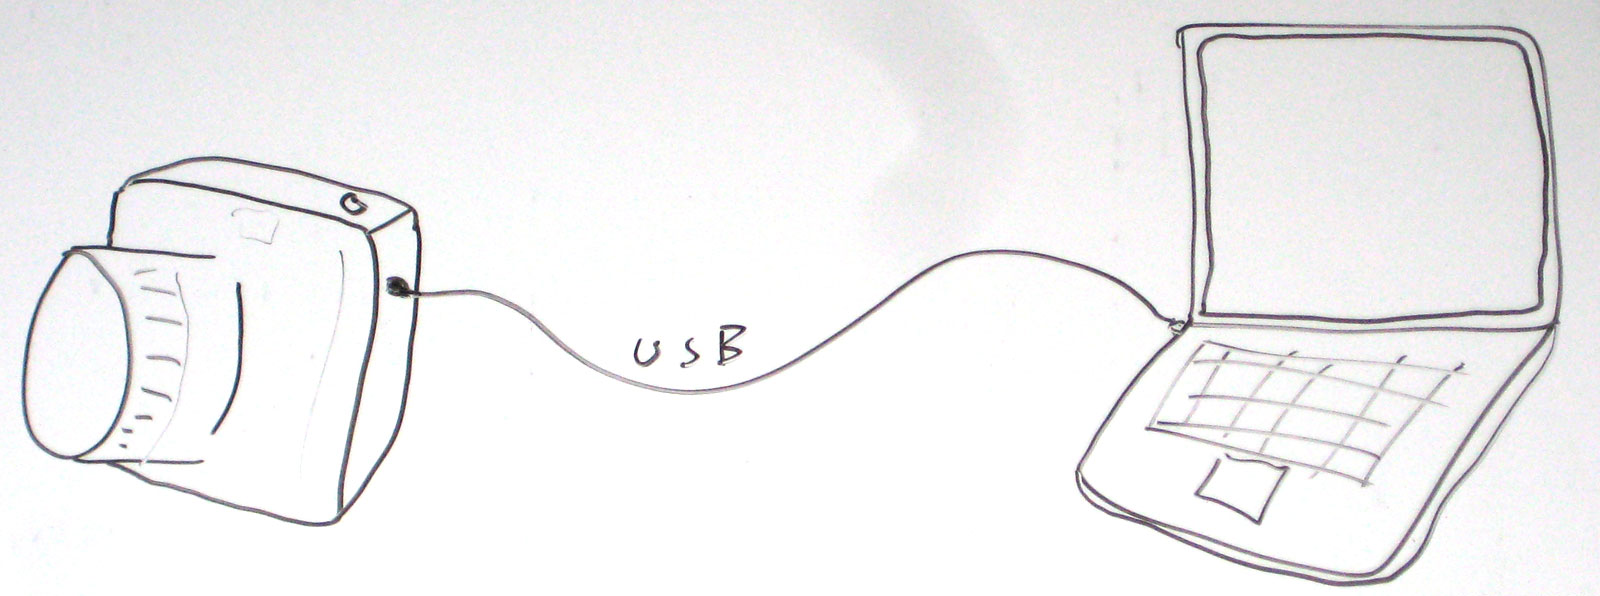
Next, open the laptop and rest it somewhere accessible and secure.  Connect the 6 ft. USB cable to the 10 ft. USB cable extension if nessecary, then plug the camera into the laptop.

photo-01

Next step is to get power.  Run your extension cable if nessecary, but run power to your laptop.  Make sure you tape down the cable out of everybody's way.

Finally, leave a small excess of around 3-5 feet of ethernet cable near the laptop incase anyone trips on it, and run the rest all the way to the main switch which is typically located near the main editing station.  Take great care to keep the cable out of the way and to tape it down.  After you run the cable, make sure you have a connection.

After all these cables have been run, you need to make sure that the laptop and camera are configured properly.

Configuration

Digital SLR Settings

You should probably already know a thing or two about it, but it never hurts to check things over again.

[MAKE LIST OF TOP THINGS TO CHECK BEFORE SHOOTING]

Laptop System Settings

The computer should probably be mostly setup already, but just confirm a few things.  First of all, make sure all power settings are turned to let the machine run no-matter what.  Disable any action when you close the lid of the machine.  Turn the sound all the way down to zero.

Dim the display as low as it can go, and turn off any extra lights that you can.  On a Gateway, push "Fn + F1".

Folder Structure

foldersCheck to make sure the proper folder structure is in-tact for where you will be saving your photos.  On the C drive, there must be a folder called "Dance-Photos", with the subfolders: "Library", "Live-Capture", and "Buffer".
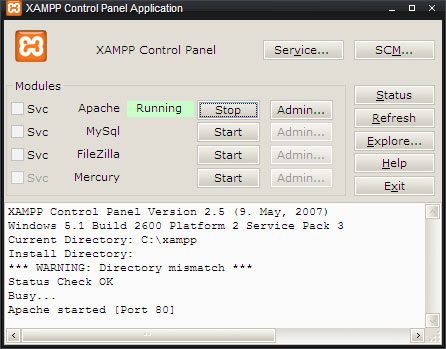
Xampp Installed and Running

Xampp runs a local apache server.  It doesn't need to be installed into the registry, but instead just sits flat on the C drive.  You can find the program at "E:\All Users\Downloads\Xampp\", and just extract it to "C:\xampp\".  Have a shortcut to "C:\xampp\xampp-control.exe" on your desktop.  Open this utility, and push "Start" on the top item, Apache.

xampp

Dance Photos Autosuggest and Transfer Program

Navigate to "C:\xampp\htdocs\" and verify that the folder "dance-photos-autosuggest" exists.  If not, you can download it here.  Open a web-browser such as Mozilla Firefox or Google Chrome, and browse to "http://127.0.0.1/dance-photos-autosuggest/"

If you would like, you can read further documentation on this program here on the knowledgebase. [ADD LINK]

Canon EOS Utility

If a Canon camera may get used at this competition, make sure that the Canon EOS Utility is installed and configured for teathered capture.  You can find the program on the CD that came with your camera, or in the downloads folder at "E:\All Users\Downloads\Canon Solutions Disk 19.0\".  Run "setup.exe" and follow the instructions for installing it under Canon DSLR Teathering.

eos-utilityOpen the program, and make sure it's configured properly. [GET TIM'S CAMERA FOR MORE DOCUMENTATION IN THIS SECTION]

Nikon Camera Control

If a Nikon camera may get used at this competition, make sure that the Nikon Camera Control program is installed and configured for teathered capture.  You can find the program in the downloads folder at "E:\All Users\Downloads\Nikon Camera Control Pro V2.3/".  Follow the instructions in that folder inside "Instructions.txt".

nikon-camera-controlOpen the program, and make sure it's configured properly.
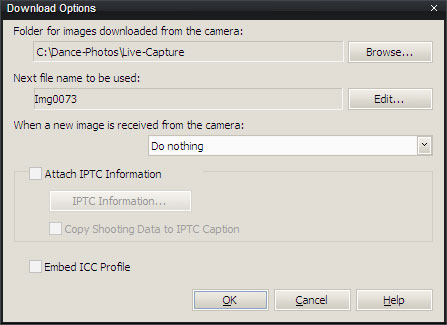
Go to TOOLS | DOWNLOAD OPTIONS, and in the top field, click BROWSE to change the destination folder.  Make sure that you set the download folder to "C:\Dance-Photos\Live-Capture\".

nikon-download-options

Also, confirm that the drop down dialogue is set to "Do nothing".

nikon-camera-in-my-computer

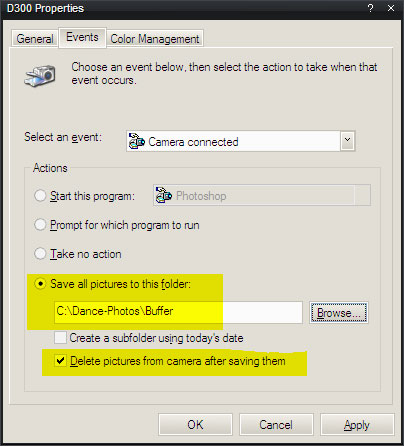
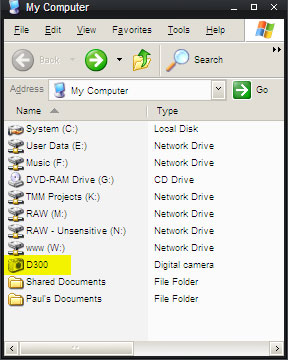
Next step is to plug in the camera via USB.  Open MY COMPUTER, and you will see the camera as a device without a drive letter.

Right click on the camera and go to PROPERTIES.

Go to the EVENTS tab.

Make sure that it is set so that when the camera is connected, it will Save all pictures to this folder: "C:\Dance-Photos\Buffer\", and will delete pictures from the camera after saving them.

nikon-properties-events-tab1

Now the camera should be setup to work properly!  You may want to shoot a few photos to test out the system.

Tasks

Capture Photos

As the sole photographer, it is your job to take around 30-50 photos per dance number.  These photos are automatically downloaded via USB straight to a temp folder on the laptop.  If some rare cases, it may be nessecary to unplug the USB cable to get a better shot.

Transfer Photos

The laptop is running a program where you can tag the photos easily and send them off to the photo server.  Type the dance name and number into the text field in the program, and you may get an autosuggestion for what you were going to type.  The best time to do this would be at the beginning of the dance, when the MC is announcing the dance.  You may even type a name and number that is not auto-suggested.  At the end of the dance, after you have shot all of your photos, simply push the "Transfer" button, and type the name of the next dance when it is announced.  Repeat this process for each dance.

If you are uncertain of what dance was just performed, type something like the time with a hyphon, and Uncertain.  For example, "17-59 Uncertain".  The editor and sales departments may notice these and fix them, but you should always check in with them at a break to make sure these get tagged properly.

Use the Buffer

The buffer is for the rare case that you need to unplug the USB to get a different angle,  When you return to the laptop and plug in the camera again, the photos on your memory card will automatically begin to transfer into the buffer folder.  You are free to continue shooting the next dance number while this is in progress.  When the transfer is completed, you will be prompted to delete the copies that are still on your memory card.  Press yes, to clear your card.  After you are finished with the dance you were just shooting, transfer it off to its proper folder.  Now that your Live-Capture folder is empty, press the button in the bottom right of the Auto-suggest program to move all the photos in your Buffer into your Live-Capture folder.  Type in the name of this dance number, and push transmit.  If you wish to add these to another dance folder, simply type the same name as before.

network-connectionMonitor Network Connection

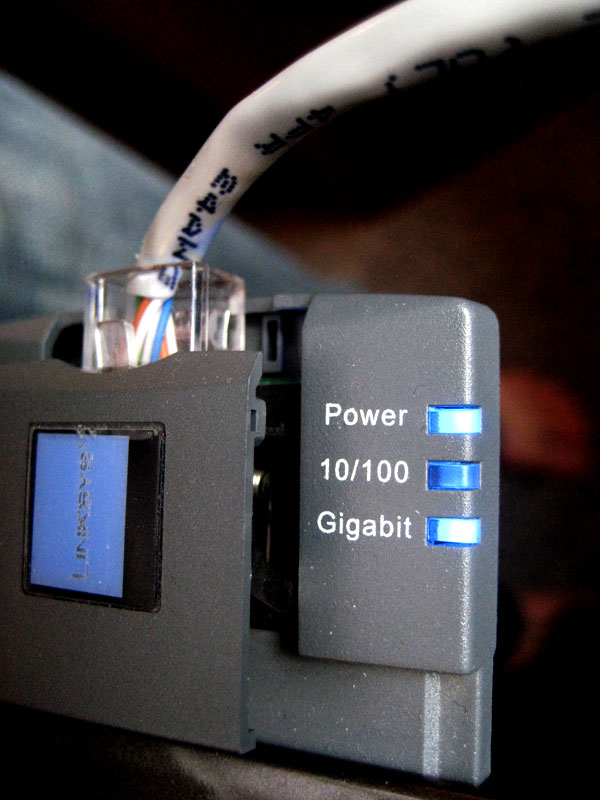
Every little while, check the light on your network card to make sure that you are still connected.

Daily Morning Tasks

Get your gear out of the editing area, or vehicle and bring it to your setup area.

Laptop Setup

Plug in the laptop power and network cable, then power it up and check the network connection to the photo server.

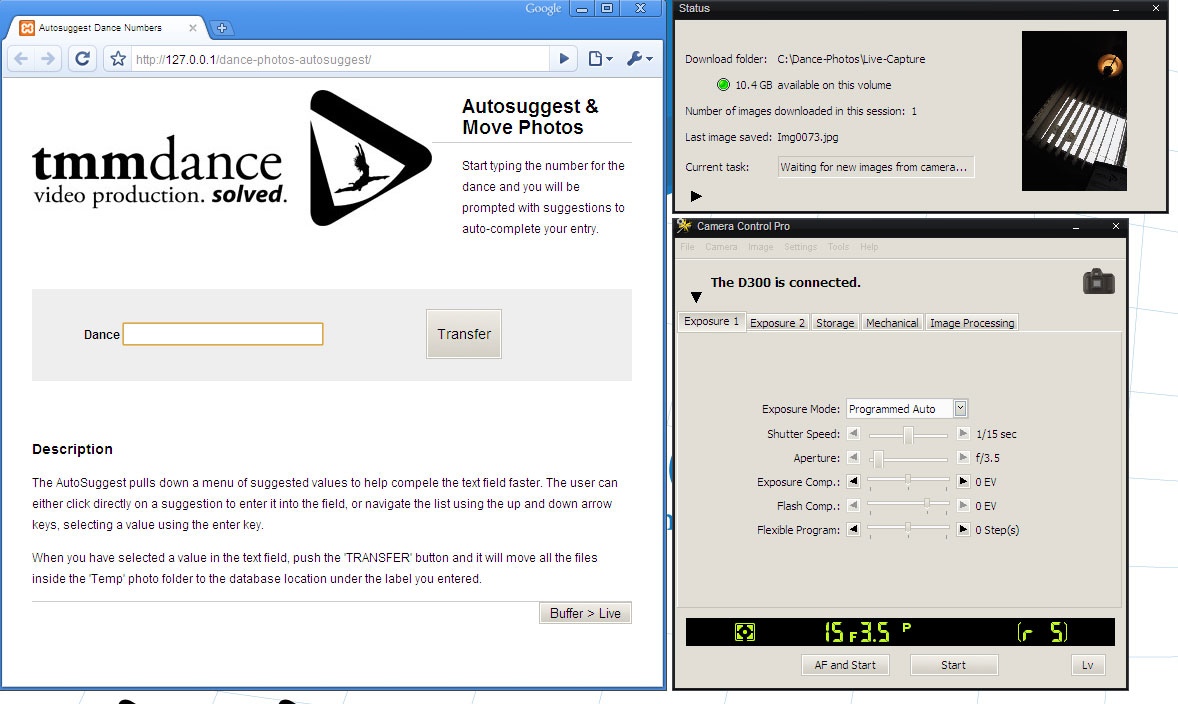
The laptop should have open a bunch of programs at all times:

  • Canon EOS Utility or Nikon Camera Control - Check the settings every morning of where the photos are getting stored to.
  • Xampp Control Panel - Start the apache module.
  • Dance Photo Autosuggest and Mover
  • Explorer window to "C:\Dance-Photos\" - Keep this minimized, but open just incase you need to rush over to it to make a change.
  • Wallpaper - should either be a TMM wallpaper, or blank.

As far as screen real-estate goes, its suggested to have something similar to below:

screen-real-estate

Lastly, make sure your screen brightness is turned down, your volume is muted, and your extra lights are turned off if you can (For Gateway laptops, press "Fn + F1").

Make sure you also have the following:

  • Event program
  • Pen
  • Memory Cards
  • Spare battery
  • Battery charger plugged into powerbar

Lastly, make sure you have a fully charged battery, empty memory card, and the camera is connected via USB to the laptop.

Daily Closing Tasks

At the end of the day, turn off the SLR camera and put the batteries on to charge. Empty photos from all memory cards.

Close all programs on the laptop and shut it down. Unplug the power cord from the power bar, and the network cable. Leave the power bar and network cable tucked away nicely, and pack up all other gear. Bring the gear to the editing station, or in some cases, put it in the vehicle.

Location Wrap Tasks

On the last day of the dance competition, once it's time to shut down, start by performing the Daily Closing Tasks listed just above.  Afterwards, Remove the tape from the extension power cable and neatly wrap up the extension cable and power bar.  Next, un-tape and neatly wrap up the network cable that runs from your location to the switch.  Pack up all the gear neatly in a designated location where everyone is bringing their gear.  When you are wrapped up, check if other departments require any help.

Creative Concept or How to Take Photos

When taking photos of dance, customers look for faces! With this in mind, photos should be taken as tightly framed around each dancer as possible. The fewer dancers in the number, the easier it is to take good photos of the individual dancer. In group dance situtations, make sure to take the finishing pose photo of the entire group and a few group photos, but most photos should be of individuals.