Today I figured out how to copy files to a Mac formatted drive in Ubuntu Linux for the purposes of a film transfers and why it doesn't usually work.
Ubuntu Linux is capable by default to read HFS+ (most common current mac filesystem) and write to it unless journalling (a feature of the filesystem) is enabled. In this case, Ubuntu, or any other system except for OSX can only read the contents of the drive.
The default way to format a drive with DiskUtility on a Mac is to HFS+ with journalling on. Because there is no easy button for toggling it off, most people giving us drives formatted for use primarily with a Mac that have journalling enabled.
Journalling is great - it provides a way for a hard drive to very very quickly find the last known "good point" when it is unexpectedly snapped off due to a power failure or fails in other ways. It can prevent a lengthy rebuilding of the filesystem and have you up and running in seconds again. Journalling is required on any Mac boot drive. NEVER DISABLE JOURNALLING on the boot drive of any Mac.
You may need to disable journalling if you want to use Linux to copy files to external USB & FireWire drives.
Unfortunately, the only way to do this that I have found so far is on a Mac.
Even on a Mac, since Leopard (OSX 10.5) the option to disable Journalling in the Disk Utility was removed.
The functionality still exists in the terminal interface to diskutil though.
I have tested the following steps for disabling journalling on an external drive on Snow Leopard (OSX 10.6.4)
- Image that we want to disable journalling on an external drive named "Lucy"
- Open Terminal.
- Type "
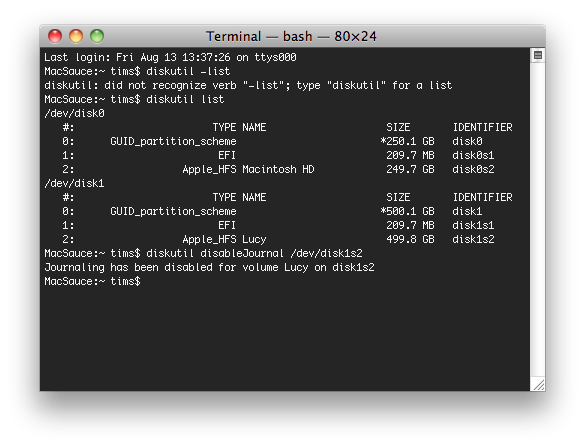
diskutil list"
- You will see something like this.

- You can see that the actual volume named "Lucy" is disk1s2. The preceding volumes in the same list are partition information. Don't mess with them!
- First you need to unmount the drive. You can do this from the finder or desktop by "Ejecting" the drive.
- To disable journalling on Lucy, you would now type "
diskutil disableJournal /dev/disk1s2". Obviously replace "disk1s2 with your own volume's identifier.
- If it works, you will get the message "
Journaling has been disabled for volume Lucy on disk1s2".
- If it fails, you may want to try the same command as root by adding
sudo to the beginning of the command. This may require you to enter root's password.
Unfortunately, we aren't done yet. Typically, we create a folder called "tmmedia" on a customer's drive to copy our files to. Doing this on while using the Mac is the most painless.
When you get to the Linux computer you will use, you will need to start terminal and navigate to the drive. Usually the drive is located at /media/Lucy/ in our situation.
- Type "
cd /media/Lucy/" to navigate there in Terminal.
- Now we should already have created a folder called "tmmedia" on the drive.
- We need to change permissions so that we can write to the drive.
- The easiest way to do this is to type "
sudo chmod 777 tmmedia" assuming that we have navigated here already and that the folder is called tmmedia.
Now we can finally use the Linux browser to simply drag and drop the files we want to copy.
Once the copy is complete, if we want to re enable journalling to keep our customers' files safer, simply start Disk Utility on a Mac, click on the drive, and then click on the big green enable journalling button in the middle of the graphical user interface.


