Research & Develop...

Real Fonts on the Web with TypeKit

It recently came to my attention that there is a very cool feature of CSS called @font-face that I had never heard of before. Since Internet Explorer 5.5 & a few versions ago of Firefox, Safari, and Chrome this CSS feature has been supported. It allows you to load any font in particular formats into the browser for use on any site.

The reason we haven't seen beautiful type everywhere is that few font foundries licensed any of their fonts ifor use on the web. Enter TypeKit. TypeKit is a web-font hosting and serving service that has been slowly building up a repository of fonts that you can license on a yearly basis to use legally on the web. The price is very economical, and as of a few days ago, they serve a good collection of Adobe Fonts.

I did some testing and its laughably easy to setup the service and install the fonts on your site. I set it up on my FireflyPhoto.ca site briefly, but I will be testing it more extensively on TimSchafli.ca.

The service automatically serves the right font files to Internet Explorer or the other browsers (of course Internet Explorer likes to use its own standard for the CSS implementation) and should the browser STILL not be able to display the fonts, you can still fall back to the next font in the CSS font-family stack.

You can sign up at FontKit.com and the subscription we want is probably the "Portfolio" service which gets us: Unlimited Fonts per Site, Usage on Unlimited Sites, access to their entire font library, and 500,000 pageviews a month. All this for the low-low price of $49.99 USD / year.

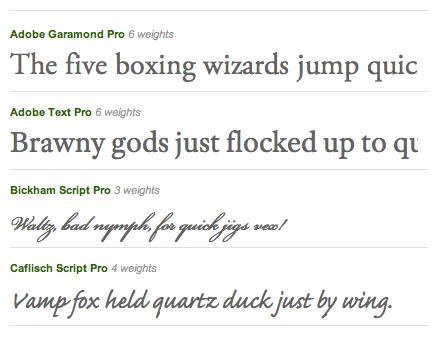
With the addition of the Adobe Fonts, they now have all the fonts we regularly use such as Adobe Garamond and Myriad with - get this - all the weights. That means we can, for example, us real italic Adobe Garamond on our sites WITHOUT using images saved for web. All the text remains purely HTML which means it's GREAT for Search Engine Optimization while the CSS rules make it look very pretty.

Fonts I'd love to use on the web (and now we can): Adobe Garamond Pro, Myriad Pro, Chaparral Pro, Minion Pro, Caflisch Script Pro, Bickham Script Pro.

Copying Files to a Mac formatted drive in Ubuntu Linux

Today I figured out how to copy files to a Mac formatted drive in Ubuntu Linux for the purposes of a film transfers and why it doesn't usually work. Ubuntu Linux is capable by default to read HFS+ (most common current mac filesystem) and write to it unless journalling (a feature of the filesystem) is enabled. In this case, Ubuntu, or any other system except for OSX can only read the contents of the drive.

The default way to format a drive with DiskUtility on a Mac is to HFS+ with journalling on. Because there is no easy button for toggling it off, most people giving us drives formatted for use primarily with a Mac that have journalling enabled.

Journalling is great - it provides a way for a hard drive to very very quickly find the last known "good point" when it is unexpectedly snapped off due to a power failure or fails in other ways. It can prevent a lengthy rebuilding of the filesystem and have you up and running in seconds again. Journalling is required on any Mac boot drive. NEVER DISABLE JOURNALLING on the boot drive of any Mac.

You may need to disable journalling if you want to use Linux to copy files to external USB & FireWire drives.

Unfortunately, the only way to do this that I have found so far is on a Mac. Even on a Mac, since Leopard (OSX 10.5) the option to disable Journalling in the Disk Utility was removed. The functionality still exists in the terminal interface to diskutil though.

I have tested the following steps for disabling journalling on an external drive on Snow Leopard (OSX 10.6.4)

  • Image that we want to disable journalling on an external drive named "Lucy"
  • Open Terminal.
  • Type "diskutil list"
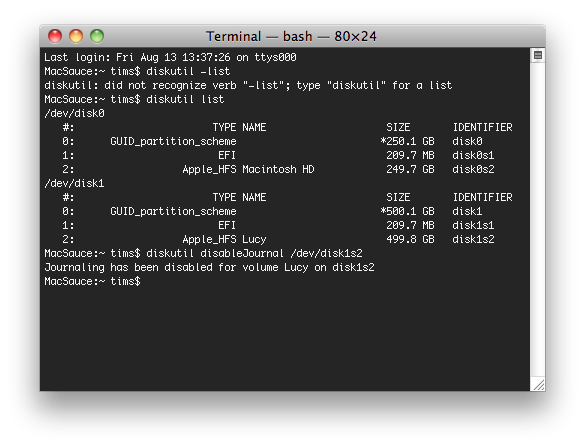
  • You will see something like this.

  • You can see that the actual volume named "Lucy" is disk1s2. The preceding volumes in the same list are partition information. Don't mess with them!
  • First you need to unmount the drive. You can do this from the finder or desktop by "Ejecting" the drive.
  • To disable journalling on Lucy, you would now type "diskutil disableJournal /dev/disk1s2". Obviously replace "disk1s2 with your own volume's identifier.
  • If it works, you will get the message "Journaling has been disabled for volume Lucy on disk1s2".
  • If it fails, you may want to try the same command as root by adding sudo to the beginning of the command. This may require you to enter root's password.

Unfortunately, we aren't done yet. Typically, we create a folder called "tmmedia" on a customer's drive to copy our files to. Doing this on while using the Mac is the most painless.

When you get to the Linux computer you will use, you will need to start terminal and navigate to the drive. Usually the drive is located at /media/Lucy/ in our situation.

  • Type "cd /media/Lucy/" to navigate there in Terminal.
  • Now we should already have created a folder called "tmmedia" on the drive.
  • We need to change permissions so that we can write to the drive.
  • The easiest way to do this is to type "sudo chmod 777 tmmedia" assuming that we have navigated here already and that the folder is called tmmedia.

Now we can finally use the Linux browser to simply drag and drop the files we want to copy.

Once the copy is complete, if we want to re enable journalling to keep our customers' files safer, simply start Disk Utility on a Mac, click on the drive, and then click on the big green enable journalling button in the middle of the graphical user interface.

Static DHCP IP Addresses

IP Address Computer Name Description
192.168.0.1 Wireless Router (NOOB) Main DHCP Router
192.168.0.2 Wireless Router (STFU) Secondary, DHCP Disabled
192.168.0.100 Bob Server
192.168.0.101 Xavier Workstation
192.168.0.102 Yonder Workstation
192.168.0.103 Drone Linux Webserver
192.168.0.104 Odin Jason's Computer
192.168.0.105 Sparta Laptop Workstation
192.168.0.106 Sparta (Wireless) " "
192.168.0.107 Danger Inactive due to age
192.168.0.108 Danger (Wireless) " "
192.168.0.109 Kia Workstation Sidekick
192.168.0.110 Zergling Linux Webserver
192.168.0.111 Sam Server
192.168.0.112 Music Rec-room Music Computer
192.168.0.113 Red 3 Public Terminal
192.168.0.114 TV Upstairs TV Computer
192.168.0.115 Phi Workstation
192.168.0.116 Penny Small Netbook
192.168.0.117 Penny (Wireless) " "
192.168.0.118 Bob (Port 2) " "
192.168.0.119
192.168.0.120+ Open Slots

8 Track Audio Recording with Timecode

Talked to Spencer about hardware to record about 8 tracks, and here is my notes:

Apogee Ensemble http://www.apogeedigital.com/products/ensemble.phpAD16X

Digidesign - No good, propriatary

Rupert Neve

http://mercenary.com/nev8816.html

avalon

M-box 2?

And I also came out with the following list of websites as resources:

Website Version History for tmmedia.ca

Over time, our main website has had a few different faces.  This article is here to document them.  The domain was purchased on May 14, 2003 with Tucows, and our hosting with Ipower.  We have been with both of these since.  You can always check out our earlier website versions (and others) on the Wayback Machine.

May 2003: Version 1

2003 Website

This first version was entirely HTML, written by Paul while he was just in grade 10. I believe it was launched the day we bought the domain, May 14th. There are about a dozen unique pages, featuring a services list of four bullet points, video samples such as Elect Spencer 2002, Elect Spencer 2003, The One, The Shuttle Program, and Kat's Death. Of the seven main menu items, three of them only ever said "Coming soon" (Info, Prices, and Links).

October 2004: Version 2
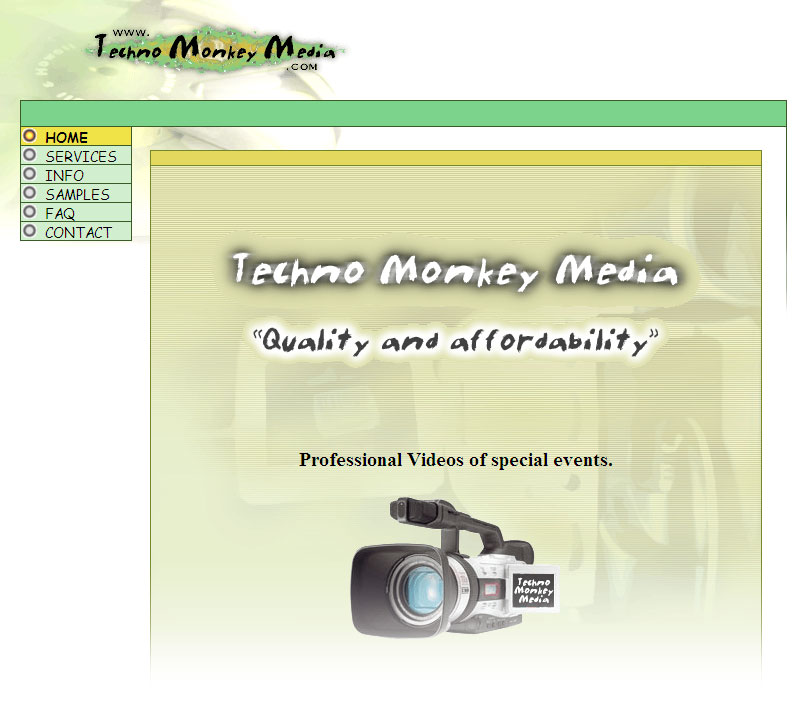
2004The second version of the website introduced CSS and PHP.  The PHP simply displayed the main menu and  grabbed the contents of the selected page through reading .txt files as the "database". Within a month, version 2.1 was released, which contained upgrades to the main index file and filled in more .txt files as database elements.  On the homepage, we sported the cheesy slogan "Quality and Affordability"!

On this version there was a nifty "drop-down menu" and tacky samples section with such jems as Paulish Can Do It, Local Jumps, Elect Spencer 2004 and more!  The services section was slightly improved to include: Digitizing Slides & Negatives, Film Transfers, Multi-media Presentations, Photo Restoration (which we never got a single job for), and the two most amazing titles ever, Special Projects and Video Production.

July 2008: Version 3

2008 WebsiteWith almost four years dating the previous version, Paul had accumulated a wealth more web-design knowledge, and with the addition of Spencer as the first "full-time" contractor/staff member, Paul had time to work on a new website from scratch.  The concept was to keep it clean and white-based to allow maximum flexibility, as we has an inkling that company growth was on the horizon.

The site deisgn was written from scratch, first for our brand new tmmdance.com website, and a few weeks later was adapted and improved for tmmedia.ca. It was entirely PHP, simply based on the concept of using the include function to drop each page as a PHP file into the website framework.  This was the first design to include streaming flash video samples, and they were showcased right on the homepage.  It also had AJAX driven Place Order, and Contact pages.

Samples that graced the hompage of this site included Aerial Footage of Vancouver, Port Coquitlam Canada Day Celebrations 2008, Chloe Ellis - The Masquerade, and Store Wars at Cypress Mountain 2009.

It was extremely flexible, which became its largest downfall when we started to fill it in and realized we could go on forever.  In January of 2009, the header graphic was replaced with our new logo, and design on a new website had already begun.  It was only online less than a year.

March 2009: Version 4

2009 Website

As the company is moving forward heavily into developing the base structure, we adopted a new logo to suit our more professional nature.  To convey professionalism, we did a complete re-design of the website and devoted well over one hundred of hours into it's development.

The main site is built with WordPress, with plans for additional components for incorporating surveys, client login, and a newsletter component.

The website went live at 5:57pm on March 26, 2009.

Our Place in the Growth of the Internet

I was reading a lengthy article on the Google blog about the importance of their existance in rapid expansion of the internet, and this paragraph stuck out to me as how we fit into their picture:

Systems that facilitate high-quality content creation and editing are crucial for the Internet's continued growth, because without them we will all sink in a cesspool of drivel. We need to make it easier for the experts, journalists, and editors that we actually trust to publish their work under an authorship model that is authenticated and extensible, and then to monetize in a meaningful way. We need to make it easier for a user who sees one piece by an expert he likes to search through that expert's entire body of work. Then our users will be able to benefit from the best of both worlds: thoughtful and spontaneous, long form and short, of the ages and in the moment.

// http://googleblog.blogspot.com/2009/02/from-height-of-this-place.html

Zooming Tests on Canon XH-A1

Hey Shawn,
I just did up the little tests you were asking about, and the results are below.
As for the zoom time, in the custom functions menu, there is an option for a "high-speed zoom" setting:
  • When disabled, zoom to max takes approx 2.30 seconds.
  • When enabled zoom to max takes approx 1.25 seconds.
And the following is a chart of zoom percentages of when the camera's aperture is stopped down to the corresponding values.
 0 to 19 1.6
19 to 41 1.8
41 to 54 2.0
54 to 64 2.2
64 to 73 2.4
73 to 80 2.6
80 to 92 2.8
92 to 97 3.2
97 to 99 3.4

Timecode Sync

Being able to sync events on the timeline according to timecode is a feature that is built into Vegas, and would automatically synchronize clips with zero effort. I took some time to research different timecode settings for the Canon XH-A1’s, and ended up performing a few tests. Typically we are running the camera in the default “REC-RUN” format, and I switched it to “FREE-RUN”, which, when synchronized with the second camera, means that both cameras are always displaying the exact same timecode because the counter is always running. Even if the battery is removed. It’s running off the ‘backup-battery’ technically which also basically keeps track of the clock.

The problem turned out not to be on the camera end, as the timecode recording worked great no-matter which setting you had it on. The problem lied within Vegas, as when I looked at the imported clips in the Project Media dialogue, each clip’s “Timecode In” started at 00:00:00:00. This means that the timecode information wasn’t being captured with Vegas’s built in video capture program.

Also, there is an option to synchronize clips according to the date and time stamps, but Vegas didn’t appear to import these either. Online research revealed that it’s even possible to get information from the camera such as the F stop, shutter speed, gain, and more!

In conclusion, I believe that all of this will be fixed in future releases, or with the next camera (probably being tapeless). For now, it’s not a huge issue when we line it up by audio wave-forms, so we won’t make it a priorty to find alternate software to capture this special XIFF data.

As a quick last side note, it looked like Edius might be able to do it.

UPDATE May 12, 2009

After upgrading to Vegas 9.0 the other day, I noticed timecodes in the media bins in vegas!  I played around with it a little and it appears that Vegas can now read the timecode information on all the clips that have been imported from the XH-A1's.  It will need to be tested a little further, but it could become a massive time-saver.

2009 Dance Survey Questions

Half way through our dance productions in June of 2008, we came up with the idea to include papers with the web address to a survey about how we can better improve our dance coverage.  We didn't go ahead with it, but we tabled it to give it a shot in 2009. Currently we're drafting the list of topics for questions below, that we might want to ask:

  1. Fullscreen vs widescreen
  2. Camera operator's ability to follow action (framing, zooming...)
  3. Cuts or fades
  4. Audio of music vs audience levels
  5. Graphics for Case covers and disc surfaces
  6. Scene Selection
  7. Cost of package
  8. Amount of recital per package
Feel free to add more to the list above.

Kicker Lighting with Flash

Something that can add a whole lot of interest and dimension is a kicker light behind the subjects. The great thing about a kicker is that it does not require much finesse to use, since the concept is to create sidelighting and almost blown to blown highlights.

Kickers can be used in 2 and 3 light configurations. If you have two lights, expose the scene with your main light only and use a fill card or reflector as a secondary light source to control shadow fill. Then add the 2nd light as the kicker behind the subject set to some strength that is higher than the main light. With three lights, simply expose with your main and fill, then add your kicker - again on a higher power setting than the main light.

Kickers can require a bit of tweaking to get the perfect amount of back\sidelighting, so play with its aim a bit, but generally it should sit on the floor aiming up. Another thing to consider is if the subject is against a textured wall or surface, the kicker will really help to define that texture. In conclusion, using a kicker will help to add seperation to the background, and add highlights at the edges\sides of the subjects.

High Quality Video for Web

A few weeks ago, a colleage of mine emailed me asking a few questions:

  1. What export settings are best for iTunes podcast? High quality
  2. What export settings are best for YouTube? High quality
  3. If you are familiar with Vimeo, what settings for this? High quality.

And the following was my answer:

As far as the "best" quality settings for uploading to sites like YouTube, I don't have any technical rules - more just a rule of thumb that you want to throw more quality at it than it would stream at. For example, most sites stream at a max of 400 kbps, so I'll render my videos at 512 kbps and upload that. They transcode them for flash on their servers, and that becomes the final quality that people will stream. It doesn't matter what format really, but I generally use wmv and occasionally mov.

Best Project Settings for Vegas

For the highest quality results, you are always best off matching your project settings to your main (or largest resolution) media source.  For example, I shoot HDV at 1440x1080 in progressive scan with a widescreen pixel aspect ratio of 1.3333 at 30 fps, and so I match my project settings to this when I start. If you are wondering how to find out what your media properties are, the quickest way to figure it out is to import it into your Project Media, then click on it once and it will display the properties beneath it, as highlighted in the screenshot:

You can find the same settings when you right click on a video clip in the media pool and check the properties.  As long as you match your project settings to this, you should be just dandy.