Processes & Proced...

How Much Usable Space For Different Formats - FAT32, exFAT, NTFS

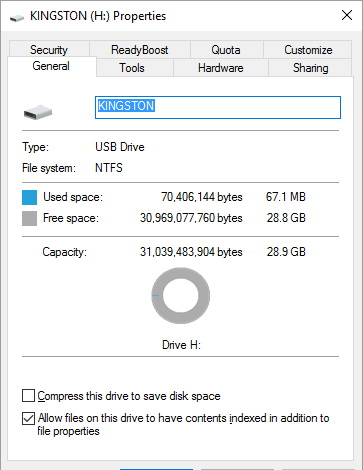
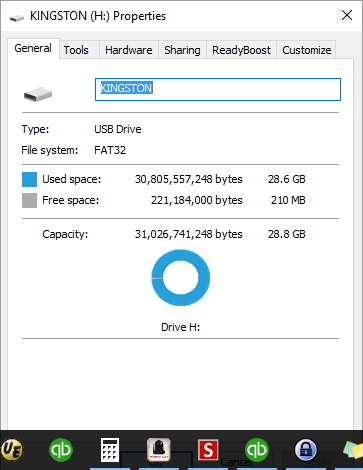
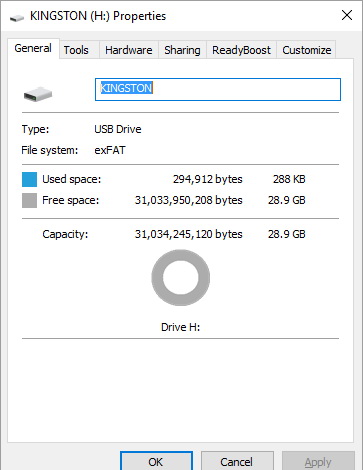
Overview When formatting flashdrives or whatever....what is the best format for maximizing space on the device.  We tried a 32GB Kingston G3 traveller and formated it for FAT32, exFAT, and NTFS.

Solution:

It really did not make too much of a difference.  The exFAT seemed to have the maximum of free space and the NTFS had the maximum of overall space.  Overall space includes both the unusable overhead space and the actual free space.  It seems that exFAT does not use a lot of overhead space.

exFAT allows for the maximum free usable space.

Images:

USB_FAT32 USB_exFAT USB_NTFS

Format SDcard to NTFS

Overview Customer wanted their videos on an 32GB SDcard.  The new card was formated in FAT32 (standard for these camcorder cards).  When I tried to format the card to NTFS, it gave me no options but FAT32.

Solution

Change the card from "optimize for quick removal" to "optimize for performance".  Once this is done you will have the option to format to NTFS.

Reference

http://superuser.com/questions/92433/reformat-sd-card-to-ntfs


Referral Commission in QB - Procedures

Overview Currently we have B2B customers that are sending us business.  These referrals break down into two categories:

  1.  The referring business handles the customer and just sends us the media to digitize.
    1. We give them a 30% discount on most services
  2.  The referring business sends the customer to us and we handle everything.
    1. We give them a 10% discount on most services.

The discount is dependent on how much we handle and how much the referrer handles.

Procedure - 30% discount

  • The media gets sent to us from the referrer.
  • We log the transfer under the referrer name plus the customer name.  For example, Media Button sends us Carl Smith.
    • The project is named MB - Smith.  This naming is used for project folders, film albums, job entries
    • When the project is entered into the job list, Media Transfer Progress sheet....on page 2 add the 30% and the discount calculations in columns K to M
    • The Quickbooks entry will be under the customer of Media Button as the job "Carl Smith"
  • The media transfer project will NOT use our contact info as this project is done under the referrer's name
  • When we create the invoice:
    • create a sub total for the transfer items
    • find and enter the B2B for 30% under the correct major heading (ie. film transfer)
    • products such as harddrives, flashdrives, etc are NOT discounted and therefore should be listed below the discount
    • send a copy of the invoice to the referrer
  • The referrer will schedule a courier to retrieve the project
  • The referrer will use our invoice to create their own invoice....we suggest that they mark up our invoice by 30% to collect their commission.
  • Once the referrer has gotten paid, we then get paid from the referrer for the amount we invoiced the referrer.

Procedure - 10% discount

  • The referrer lets us know that they have sent a customer our way.
  • The customer drops off the media.
  • We log the transfer under the referrer name plus the customer name.  For example, Media Button sends us Carl Smith.
    • The project is named MB - Smith.  This naming is used for project folders, film albums, job entries
    • When the project is entered into the job list, Media Transfer Progress sheet....on page 2 add the 10% and the discount calculations in columns K to M
    • The Quickbooks entry will be under the customer of Media Button as the job "Carl Smith"
      • the customer information: name, address, email, phone etc will be entered as this invoice will be given to the customer
  • As this project is done completely by LHF, we use all our branding
  • When we create the invoice:
    • create a sub total for the transfer items (this is done so that we have a reference for the 10%)
    • make sure the name etc is filled in for the customer (address, phone, email)
    • products such as harddrives, flashdrives, etc are NOT discounted and therefore should be listed below the discount
    • send a copy of the invoice to the customer
  • The customer will come by and pick up and pay for the project
  • Create a credit memo for the 10% owed the referrer

Creating the 10% Credit Memo

We've created a memorized 10% credit memo to make things a bit easier.  Here's the steps:

  1. Go to List and open Memorized Transaction List
  2. Select "referral fee".  This should open the Credit Memo window.
  3. From the drop-down Customer:Job, select the referrer customer, ie. Media Button.
  4. Enter 10% of the sub total on the customer's invoice....do not enter the grand total.
  5. Make sure the correct tax is applied (use G if the invoice only has G or S if the invoice has S).
  6. Enter the customer's name in the Memo box.

The credit can be applied to the customer's account against outstanding invoices, can be accumulated and paid later, or we can issue immediate payment.


RTI Tapechek XCL 300 Maintenance

RTI Tapechek XCL 300 Maintenance Overview

The VHS tape cleaning and conditioning machine maintenance notes.

Maintenance

  • Periodically vacuum the interior - at least when changing tissue
  • Instructions for changing tissue as in the lid.  The tissue is capped on each end by a thumb screw (no tools needed).  The tissue cannot be reused (unless someone figures out a way of rewinding the tissue onto the spool).
  • Clean the draw arm's spindle with Windex or such.  The centre of the spindle is a little rubbery.
  • I also cleaned the other shafts and parts with glass cleaner....careful of the scrapper as it is extremely sharp.

Vegas Not Loading Audio with the Video

Overview Scanned in a U-Matic tape using Blackmagic Media Express.  This created a AVI file with a UYVY codec and PCM 24bit  codec for audio.

Sample:

General
Complete name                            : R:\Business RAW\U-matic\2016\16-04-20 Pereria Umatic tape\tape 02.avi
Format                                   : AVI
Format/Info                              : Audio Video Interleave
Format profile                           : OpenDML
File size                                : 4.12 GiB
Duration                                 : 3mn 26s
Overall bit rate                         : 171 Mbps
Video
ID                                       : 0
Format                                   : YUV
Codec ID                                 : UYVY
Codec ID/Info                            : Uncompressed 16bpp. YUV 4:2:2 (Y sample at every pixel, U and V sampled at every second pixel horizontally on each line). A macropixel contains 2 pixels in 1 u_int32.
Duration                                 : 3mn 26s
Bit rate                                 : 168 Mbps
Width                                    : 720 pixels
Height                                   : 486 pixels
Display aspect ratio                     : 3:2
Frame rate                               : 29.970 fps
Standard                                 : NTSC
Color space                              : YUV
Chroma subsampling                       : 4:2:2
Compression mode                         : Lossless
Bits/(Pixel*Frame)                       : 16.000
Stream size                              : 4.03 GiB (98%)
Audio
ID                                       : 1
Format                                   : PCM
Format settings, Endianness              : Little
Format settings, Sign                    : Signed
Codec ID                                 : 00001000-0000-0100-8000-00AA00389B71
Duration                                 : 3mn 26s
Bit rate mode                            : Constant
Bit rate                                 : 2 304 Kbps
Channel(s)                               : 2 channels
Sampling rate                            : 48.0 KHz
Bit depth                                : 24 bits
Stream size                              : 56.7 MiB (1%)
Alignment                                : Aligned on interleaves
Interleave, duration                     : 1033 ms (30.94 video frames)

GeneralComplete name                            : R:\Business RAW\U-matic\2016\16-04-20 Pereria Umatic tape\tape 02.aviFormat                                   : AVIFormat/Info                              : Audio Video InterleaveFormat profile                           : OpenDMLFile size                                : 4.12 GiBDuration                                 : 3mn 26sOverall bit rate                         : 171 Mbps VideoID                                       : 0Format                                   : YUVCodec ID                                 : UYVYCodec ID/Info                            : Uncompressed 16bpp. YUV 4:2:2 (Y sample at every pixel, U and V sampled at every second pixel horizontally on each line). A macropixel contains 2 pixels in 1 u_int32.Duration                                 : 3mn 26sBit rate                                 : 168 MbpsWidth                                    : 720 pixelsHeight                                   : 486 pixelsDisplay aspect ratio                     : 3:2Frame rate                               : 29.970 fpsStandard                                 : NTSCColor space                              : YUVChroma subsampling                       : 4:2:2Compression mode                         : LosslessBits/(Pixel*Frame)                       : 16.000Stream size                              : 4.03 GiB (98%) AudioID                                       : 1Format                                   : PCMFormat settings, Endianness              : LittleFormat settings, Sign                    : SignedCodec ID                                 : 00001000-0000-0100-8000-00AA00389B71Duration                                 : 3mn 26sBit rate mode                            : ConstantBit rate                                 : 2 304 KbpsChannel(s)                               : 2 channelsSampling rate                            : 48.0 KHzBit depth                                : 24 bitsStream size                              : 56.7 MiB (1%)Alignment                                : Aligned on interleavesInterleave, duration                     : 1033 ms (30.94 video frames)

Problem:

When the AVI file is dropped onto the Vegas timeline there is no audio track.

Solution:

Use myFFmpeg to transfer the video and convert the audio to 16 bit PCM.

How:

Open up myFFmpeg and drop the file(s) onto the window.

Use the preset "AVI pass thru, PCM 16 bit"  (on Apollo2).

FFmpeg - fixing video duration

Overview Had a capture going with Vegas where the capture crashed near the end.  The capture program ( vidcap ) did dump a avi file but the avi file's duration or length was only 50 seconds instead of 35 minutes.  Vegas will not load the whole file, just the first 50 seconds!

Solution

Rewrote the video file using ffmpeg...this also fixed the duration.

Here's the script:

setlocal
SET ffmpegpath=%APPDATA%\myFFmpeg
SET PATH=%PATH%;%ffmpegpath%
ffmpeg -i "u:\04 - Lord Howe Island\CaptureTemp_0000.avi" -c:v copy -c:a copy "good0.avi" -f null 1>out_error3.txt 2>out_error4.txt -

Vegas Capture Settings

Overview This post will itemize peculiar settings, their functions and scenarios in Sony Vegas that can sometimes stump you while capturing media.

------------------------------------

Scenerios/Issues

One issue that happened on SPACE when capturing for VHS:  every time the tape dropped it's timecode (gap in the video) the capture stopped.  The capture stopped every minute or two because there were lots of minor gaps.  All the settings under the capture preferences (both general and capture tabs, etc) windows were the same as Capture2.  Yet Capture2 worked fine as it captured the same tape as one video file....not broken into clips.  Enable DV scene detection (capture tab) was unchecked and the Enable DV device control (general tab) was checked.  The solution was to un-check "Enable DV device control".

------------------------------------

Enable DV scene detection

This setting is in the Sony Video Capture component of Sony Vegas, used to capture video footage. It is found under Preferences, under the Capture tab, and is at the top of the items of Capture Preferences.

When "Enabled" (box is checked) this option directs Sony Video Capture to independently capture "scenes" automatically thereby resulting in a list of clips captured in the chosen folder. When not checked Sony Video Capture will capture the entire media as one avi clip. If the client is intending on using clips this feature is handy, but generally we capture the entire media all at once; therefore we leave the box UN-checked.

------------------------------------

Enable DV device control

This is found under the Capture window's preferences selection under the Capture tab.   This is used for the Vegas capture to control the VCR/VTR.  Typically we use this to control the miniDV decks that connect directly to the PC via a firewire (IEEE 1394).  However, it appears that when we have this selected and we are using the Canopus ADVC 300 it causes the captured file to break up into clips every time there is a break in the time-code.  This can be VERY annoying as the tape keeps going and the capture stops.....this means a LOT of rewinding and restarting.

Leave this un-checked UNLESS you are controlling a miniDV deck....especially when using the Canopus ADVC 300.

One advantage to having this checked is that the video capture stops at the end of the tape.  With this un-checked the video capture keeps going.


------------------------------------

DV Tape Capture - DV or FFV1

Overview When capturing archival videos we are using the FFV1 codec.  Virtualdub is being used to capture directly into FFV1 within a AVI container.  Then we are using myffmpeg to convert these files into FFV1.3 codec in a MKV container.  It must be done in 2 steps as Virtualdub cannot capture directly into the final format..

Summary

We've set up a DV-NTSC shortcut on the desktops that opens up Virtualdub with settings to read the DV tape directly via firewire ( IEEE 1394 ).  One can also use Vegas to capture the DV tape.  The biggest difference between the two capture programs is that Vegas captures the camera/scene settings such as "white balance" etc.  It also appears that Vegas capture up to 48Hz and Virtualdub may only capture 32KHz.

Prefer Vegas capture for miniDV etc.

Details

Contacted Peter Bubestinger-Steindl <p.bubestinger@das-werkstatt.com> and here was his response:

About your question regarding DV:

The DVA-Profession preset for Virtualdub is for capturing DV over Firewire. I've ran tests to confirm that this method is able to capture the original DV-bitstream as-is from the tape.

That is the way we transfer most of our DV collection.

In some cases, where the data on the tapes is in a very bad condition, we sometimes fall back to capturing the SDI output of the DV deck, and then transcoding that into FFV1.

Both methods have their pros and cons.

Method 1: DV over Firewire

=====================

+) Capture original stream as-is. Including bitstream errors.

This allows full access to the original data, and gives the most options for later restoration.

+) Smaller files than with FFV1, due to the fixed DV bandwidth of

approx. 270 MB/Min.

+) If more than 2 audio channels are used, all of them are preserved

since Virtualdub currently only allows capturing the first 2 channels from SDI.

+) If 32kHz / 12bit(non-linear) audio was used for the recording, the

interpolation to 16bits linear is done on the fly by Virtualdub and saved as the main audio track in the AVI.

If at any later point in time, one wants to access the original 12bit stream, it is still available inside the original DV video track.

+) AVPreserve's "DVAnalyzer" tool can be used to do QC on the ingest

material.

No need for visual QC. This saves a lot of time, and has a better result rate than visual QC.

-) Mid-stream changes of e.g. Samplerate, or "undefined-tape" gaps between recordings however, do cause problems with transcoding later on.

Depending on the application(s) used for handling the files afterwards.

Method 2: Capture SDI output

=====================

+) All errors on the tapes are being handled in real-time by the

error-concealment mechanisms of the replayer. The resulting video (transcoded to FFV1) is then stabilized and any further editing/transcoding behaves correctly.

+) Mid-stream changes of audio samplerate, gaps on the tape, etc. are

"manifested" since they are converted to fixed samplerate and "real"

images on the output.

-) Depending on the error-handling/error-concealment mechanisms built-in the replayer, the resulting image might look okay, but there is no way for re-doing any better restoration later on, since the error parts are

- literally - concealed.

-) Slightly larger files than the original DV stream.

When there's time, I'm going to add this to our "Video Archiving FAQs"

[1] section, where I mention DV..

Kind regards,

Peter

== References:

[1]

http://download.das-werkstatt.com/pb/mthk/info/video/FAQ-digital_video_archiving.html#digital_source_capture
Blackmagic Studio Card Testing Results

Overview We purchased the BM Studio 4K to ingest videos.  The card worked great.  When setting up the second rack of equipment we decide to save some money as we didn't need the 4K features and the Studio 2 looked like it would do the job as all of our captures were analogue or low end digital.  The Studio 2 had some issues in our flow.

Studio 2 Issues

When testing we found that captures using the Studio 2 contained black frames "randomly" throughout the capture.  The same tape captured using the Studio 4K worked fine.  We used ffmpeg's blackframe option to test the files.  One file had over 400 black frames and the same file had 4 using the 4K.  During our testing we would replace the capture card, driver, and software in Rack#2 so that no other hardware was suspect.

I talked to Peter B for the Austrian archive and he mentioned that he recalled issues like that with the Studio 2 card.

The conclusion was that both Studio cards are designed for the broadcast field and both expect reasonably clean signals.  If the signal drops below the tolerance level then the frame if made black!  Obviously, Studio 2 has much lower tolerance than Studio 4K.

Solution

We bought a Blackmagic mini Analogue to SDI converter.  In Rack#2 we feed the component from the TBC into the A/D convertor along with the audio.  The A/D converter outputs the clean signal to the Studio 2 SDI input.

Rack#1 versus Rack#2 Setup

Overview We currently have two equipment racks that contain more or less similar video equipment.  The goal is to have two racks so that we can ingest two streams of video.

Flow to DVD recorder

Connections need to be set up between the VCR and the Toshiba DVD recorder.

Flow to PC

Each rack has basically four capture flows:

1)  IEEE 1394 or firewire to PC

Generally this applies only to the DVcam and miniDV decks.  The firewwire directly connects from the deck to the PC.  The PC can also control the deck.  Capture can be done using Vegas or Virtualdub (DV NTSC batch).

2)  Canopus and firewire to PC

Any of the consumer decks can be routed to the Canopus via RCA or RCA and S-Video.  Vegas DV capture is used to capture the footage.

3)  TBC and component to PC

Any consumer deck and the Umatic deck can be connected to the TBC via s-video or composite or Umatic dub.  The TBC (DPS-295) outputs via the component cables.  In Rack#1 the component plugs into the Blackmagic Studio 4K  capture card.  In Rack#2 the component and the audio plug into the Blackmagic mini Analogue to SDI and that via SDI to the Blackmagic Studio 2 capture card.  On the PC capture can be do via Vegas (HD capture) or Virtualdub or BM Media Express.

4)  SDI to PC

Some of the professional decks such as the Digibeta and the DVcam decks can output SDI directly into the BM Studio capture card.  Capture on the PC can be done via Vegas (HD capture) or Virtualdub or BM Media Express.

File Sharing With Customers

Overview Our goal is to efficiently send files to customers.  The challenge has been to send these large files in a timely manner.

We upgraded our internet from Shaw's 5/50 to Telus' 20/100Mbps in order to send files faster to our customers.

We tried sending a 1GB file using DropBox and Paul's LicketyLink (Amazon backend) and they both show speeds of about 1.4Mbps.  Google Drive showed about 17Mbps.  When I checked the route trace it show 3 hops for Drive and about 13 or 14 for the other two.

Now we have a Synology NAS set up and we just tried the file sharing using a 1.56GB video file.

Hans had some trouble with Chrome and Edge hanging and got it to work with Firefox....took more than 1 hour.  Han's download speed with Shaw is 7Mbps.  Assuming 1 hour for Hans...his speed was less than 3.5Mpbs (and this was during a busy internet time...afternoon).

Doug also tried the same file and downloaded it in about 15 minutes using Chrome.  Doug has Telus and 25Mbps download.  Assuming 15 minutes, Doug's speed was about 14Mbps.

Conclusion

We will now start using the NAS file sharing capability to send files to our customers.

How

Log into the NAS.  Browse to the file you want to share  on U or R.  Right click the file and select the share option at the bottom of the list.  Place a password on the file, leave the default of valid for 1 week, and capture the link.  Past the link into an email to the customer.

Print DVD or CD

Overview Using the Epson Print CD program to print on watershield discs I've noticed that a number of times the pictures have a green tint to them.

Setup

Xavier has the printer directly connected to it.  Apollo2 goes through the network to print to Xavier.

Tried

1) Tried printing from Apollo2 and no matter what I change the green tint remains.

2) Tried printing directly from Xavier and there I could change the tint to acceptable.

Solution - What Worked

On Xavier I printed the DVD watershield surface and it looked better.  Here's what I did:

1)  Opened the Epson Print CD program and loaded the background image that I wanted to print.

2) Select the Print button.

3) Print window should have:  Media Type:  CD/DVD;  Print Color Correction:  +1

4) Click the "Manual Print" button / printer properties / shortcuts tab

5) Select custom printing preset:  "DVD minus green tint"

To Setup Custom Color Control

1) Click the "Manual Print" button / printer properties / advanced tab

a) settings should be "color controls" and "Epson vivid"

b) click the "settings" button and make sure  settings are (or something similar):

saturation: +7

cyan:  -13;  magneta:  +11;  yellow: +2

c) save as "custom settings"

Retro Scanner Changing

Overview Sometimes you find you need to change the Retro scanner.  Here are a collection of hints and changes:

Putting software in diag mode:

In the software's window, push the following to go into diag mode, and push again to exit:   <ctrl><alt><shft>A

This will show the window with sprockets and an 'A' in the window.

Lens on LED

The lens on the LED cluster focuses the beam of light and makes the beam brighter.  The issue we found with the lens is that the beam of light did not get completely diffused.  This caused an uneven cast of light which showed up badly on B&W negative with night time shots (the film looks almost clear....but when inverted in post, the black scene has light leaking in from the right).

Changing the aperature on the lens

After removing the LED lens the light dropped off to the point where we needed to crank the exposure to the top...but we do now have the light diffused!   We need to open the aperature of the lens:

  • unscrew the lens from the mount
  • find the 3 philips screws on the aperature ring and loose them
  • move the aperature ring to the lowest number ... 2.8
  • place lens back
  • now go to focus.....because aperature has lowered, the focus has become more narrow and more critical to be bang on

Now adjust the focus

  • loosen the thumb screw while the lens is not mounted
  • mount lens back in the socket
  • put the retro software into diag mode
  • on the Retro board, flip the 5th dip switch (this disables the motors from running during testing)
  • get a good focused film clip in the gate
  • make sure that the film clip is flat down on the gate
    • it helps to lock both the take-up and the feed reels and tighten the film between both reels
  • adjust the focus ring until the software screen shows sharp
  • BTW (in the diag mode, the screen will seem brighter)
  • hold the focus ring and tighten the thumb screw (while tightening make sure the focus ring does not slip).
    • This action is not simple.  The thumb screw cannot be tightened while the lens is mounted.  This means that you need to remove the lens while not changing the focus ring!  Then you can tighten the thumb screw and remount the lens.
  • Double check the focus and make sure it has not changed.

Installing Nikon Scan 4.0.3 in Windows 10 Pro 64bit

Managed to install the Nikon driver and software into Win10 using the following article: http://blog.controlspace.org/2010/05/nikon-scan-on-windows-7-and-vista-64.html

Here it is:

Last Updated 8/23/2015 (adds mention of Windows 8 & 10 support)

There are various instructions around the internet that describe how to get Nikon Scan working on a 64-bit system.  My instructions are slightly different and use only modified installation files from Nikon (nothing from Vuescan is used).  Before I list the instructions, this will only work with and has only been tested with the following devices and operating systems:

  • Devices
    • Nikon Coolscan IV ED
    • Nikon Coolscan V ED
    • Nikon Super Coolscan 5000 ED
  • 64-bit versions of Windows Vista, Windows 7, Windows 8, and Windows 10
Here are the instructions to get this setup working:
  1. The driver included with Nikon Scan is an older 'unsigned' driver. Newer versions of Windows will only allow you to install 'signed' drivers but there is an option to enable installation of 'unsigned' drivers. Before you can install the Nikon scanner driver as detailed in the next steps, you will need to look for instructions specific to your operating system version for how to enable installation of 'unsigned' drivers. After you have done this, proceed to the next step.
  2. Install Nikon Scan 4.0.3 Vista 32-bit software. This was the last version of Nikon Scan that Nikon released before they ended support for the software. Windows will probably want to reboot after this step.
  3. At this point the scanner will not work so you will have to update the driver for the scanner with a modified version of Nikon's Setup Information File (.INF file) that works on 64-bit systems.  Create the file 'NikonUSBScanner.inf' with the contents shown below and save it somewhere like C:\Temp\Nikon (or just download NikonUSBScanner.inf):
    ; NikonUSBScanner.INF -- Windows Still Image Setup File of ; Nikon USB Scanners for Windows Vista/7/8/10 64-bit ; Manufacturer: Original by Nikon, Modifications for 64-bit by Chris Rawlings

    [Version] Signature="$CHICAGO$" Class=Image ClassGUID={6bdd1fc6-810f-11d0-bec7-08002be2092f} Provider=%ProviderStr% DriverVer=08/22/2009,1.0

    ;[ControlFlags] ;ExcludeFromSelect=*

    [Manufacturer] %Mfg%=DeviceModels,ntamd64

    [DeviceModels.ntamd64] %DeviceDescLS0040%=USBScanner,USB\VID_04B0&PID_4000 %DeviceDescLS0050%=USBScanner,USB\VID_04B0&PID_4001 %DeviceDescLS5000%=USBScanner,USB\VID_04B0&PID_4002

    ;///// USBSCANInstallSection ///// ;** Windows Vista/7/8/10 section ** [USBScanner.ntamd64] Include=sti.inf Needs=STI.USBSection SubClass=StillImage DeviceType=1 DeviceSubType=0x4000 Capabilities=0 AddReg=NKUSBSCN.AddReg CopyFiles=NKUSBSCN.CopyUSDFiles

    [USBScanner.ntamd64.Services] Include=sti.inf Needs=STI.USBSection.Services

    [NKUSBSCN.AddReg] HKR,,HardwareConfig,1,4 HKR,,DevLoader,,*NTKERN HKR,,NTMPDriver,,usbscan.sys HKR,DeviceData,ICMProfile,1,0,0 HKR,,USDClass,,"{07C71AC0-FA90-11d3-B409-00C04F87578E}" HKCR,CLSID\{07C71AC0-FA90-11d3-B409-00C04F87578E},,,"Nikon STI USD" HKCR,CLSID\{07C71AC0-FA90-11d3-B409-00C04F87578E}\InProcServer32,,,%11%\NKSCNUSD.dll HKCR,CLSID\{07C71AC0-FA90-11d3-B409-00C04F87578E}\InProcServer32,ThreadingModel,,"Both"

    [SourceDisksNames] 1=%DiskName%,,

    [SourceDisksFiles] NKSCNUSD.dll=1

    [DestinationDirs] NKUSBSCN.CopyUSDFiles=11 ;NKUSBSCN.CopyUSBFiles=10,system32\drivers

    [NKUSBSCN.CopyUSDFiles] NKSCNUSD.dll,,,32

    ;[NKUSBSCN.CopyUSBFiles] ;usbscan.sys,,,32

    [Strings] ProviderStr="rawc@live.com" Mfg="Chris Rawlings" DiskName="Nikon Scan 4 CD-ROM" DeviceDescLS0040="Nikon COOLSCAN IV ED" DeviceDescLS0050="Nikon COOLSCAN V ED" DeviceDescLS5000="Nikon SUPER COOLSCAN 5000 ED"

  4. In the same place you saved the custom INF file, you will also need the file 'NKScnUSD.dll'.  This file can be found in C:\Program Files (x86)\Common Files\Nikon\Driver\ScanUSB, so just copy if from there into C:\Temp\Nikon.  This file was installed to your system when you installed Nikon Scan 4.0.3.
  5. Install the modified driver files for your slide scanner:
    • Now that both installation files are in place in C:\Temp\Nikon, turn the scanner on and navigate to the device in the device manager (right click 'Computer' in the start menu or on the desktop --> Manage --> Device Manager).
    • Right-click on the scanner device and choose 'Update Driver Software'.
    • Next, choose 'Browse my computer for driver software' and browse to C:\Temp\Nikon where you saved the driver installation files.
    • Give Windows permission to install the driver and you should be all set to start scanning with Nikon Scan on your 64-bit Windows system.

NOTE...extra issue with Win10:

.....So many thanks. Using my Coolscan 5000 ED with 64-bit Windows 10! The only thing I had to do differently was force Windows to install the unsigned driver. Hold the shift key while pressing "restart", then follow the advanced options to start the next session with "disable driver signature enforcement". Everything else is just as described.

Dropped Frames During Capture

Problem We were experiencing lots of dropped frames during a SVHS tape capture (about 10 tapes from one customer).  We were using Sony Vegas' vidcap and the ADVC300 canopus box on the win10 PC.

We tried:

  • different system harddrives
  • confirming defrag had been run
  • CPU was not busy
  • system was not busy
  • cleaned tape

In all cases the dropped frame count did not really change.

Even tried the following DV capture programs:

  • WinDV
  • Scenalyzer

WinDV resulted in the same large number of dropped frames and Scenalyzer kept stopping before the drop frame "source".

Find

All of the tapes had gaps between the clips of a few seconds or more.  These gaps were pure snow....ie. nothing recorded.  When one of the capture programs hit the gap it immediately clocked up about 100 or more dropped frames.

Seems that there is nothing wrong with vidcap...I thought that there may have been an issue with Win10.